
If you’re in college, chances are you’ve already started your spring semester or it will be starting very soon. One of the most difficult parts of college (besides the homework, of course) is managing a complex and ever-changing schedule. If you think of each class as an individual job – making each of your professors your boss – you’ve got a lot of people to manage just to get through the week.
One of the best things you can do to start your semester off right is to leverage free online tools to help you manage your classes. In this article, I’ll show you how to manage your schedule and get organized this semester with Google Calendar.
 Step 1 – Collect Your Schedules
Before you can get organized with Google Calendar, you need to get all of your schedules together. Start by locating an official copy of your semester course schedule (which is typically available from the same website you use to register for classes). You also need to find schedules for any extracurricular activities, work, or events you plan to participate in during the semester.
Get as much information as you can for each of your events to make your schedule as robust as possible. This includes dates, durations, locations, required textbooks – even teachers. Don’t be afraid to include too much information in this step, you can always remove it later.
Step 2 – Identify Important Dates and Events
Try to identify any important dates or events that will occur this semester. The highest priority dates will be for things like when tuition is due, last day to add a course, last day to drop a course, and the date when financial aid will be dispersed.
If your university posts an official calendar, check that out and make note of any other significant events.
Step 3 – Get Organized with Google Calendar
Now that yo
 u’ve got the hard steps out of the way, you just have to put it all together. Head over to Google Calendar (this requires a free Google account) to get started.
We’ll start by creating an individual calendar to hold your class schedule. Creating an individual schedule gives you the option of toggling it on/off later on which can be handy if you’ve got a lot of events. Click Create under My Calendars on the left side of the screen.

You will be given a variety of fields to fill in like the name and description of your calendar. You will also be given the option of sharing your calendar which is great if you want to keep your
friends or relatives in the loop.

To start adding courses to your schedule, click the arrow next to your calendar on the left side of the screen and select Create event on this calendar.

Since most of your courses will repeat throughout the week, you can use the Repeat… checkbox to schedule patterns like Monday/Wednesday/Friday or Tuesday/Thursday. You can also set the last day of semester in the Until: box so your calendar will automatically clean itself up when the semester is over. 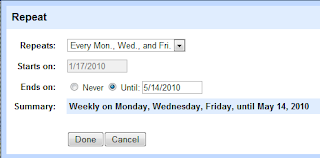

Before finalizing the course entry, I recommend adding extra information about the course in the Description field such as the instructor, textbook, and office hours.

Keep adding calendar events until your schedule is full! Don’t forget to add things like your work schedule or extracurricular activities.
Step 4 – Accessing Your Calendar
Now that you’ve got your entire schedule in Google Calendar, the last step is to make it available on any devices you own. You can always access your calendar from any web browser, but one of the best ways to interact with your calendar is to get an application for your mobile phone.
Google Calendar currently syncs with many popular mobile operating systems such as Android, BlackBerry, iPhone, Nokia/Symbian, and Windows Mobile.
Another great way to keep an eye on your calendar is to add it to your Gmail sidebar. To do this, enable the Google Calendar Gadget in Gmail Labs. If your course schedule calendar isn’t visible, click Options –> Edit visible calendars and enable it.

Step 5 – Notifications
It can be especially hard to keep track of your schedule at the beginning of a new semester, but Google Calendar can provide notifications via SMS and email to keep you on track. To enable notifications, click the arrow next to your calendar and select Notifications.
It can be especially hard to keep track of your schedule at the beginning of a new semester, but Google Calendar can provide notifications via SMS and email to keep you on track. To enable notifications, click the arrow next to your calendar and select Notifications.

If you’re really concerned about missing classes, you can enable reminders that can alert you before each class starts. This could come in handy during the first week of class and can be easily disabled after you are familiar with your schedule.

Conclusion
Although it takes a little time to put it all together, having your schedule online and available on all your devices can be a great asset throughout your semester.
Although it takes a little time to put it all together, having your schedule online and available on all your devices can be a great asset throughout your semester.
MakeUseOf 1/19/2010
No comments:
Post a Comment